In This Article
✨Was this helpful? Spread the word! 🚀
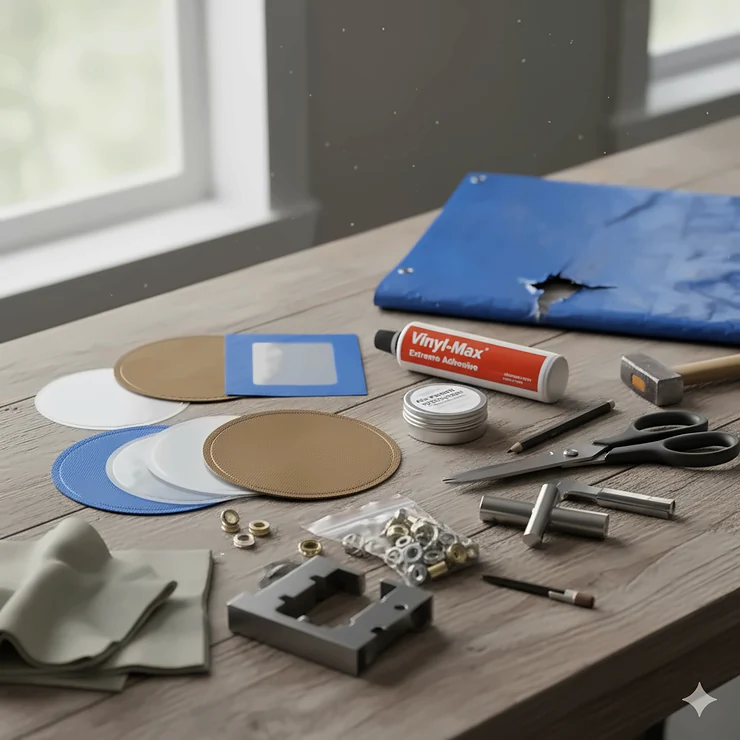
You know that sinking feeling when you discover a tear in your favorite tarp? Whether it’s covering your boat, protecting construction materials, or sheltering your outdoor equipment, a damaged tarp can quickly turn into a costly headache. That’s where a reliable tarp repair kit becomes your best friend.
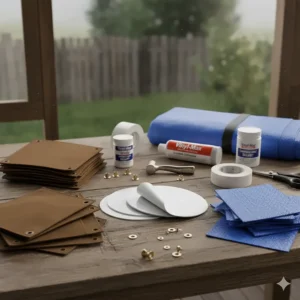
A tarp repair kit is a collection of materials and tools designed to patch, seal, and restore damaged tarps to their original protective state. These kits typically include adhesive patches, vinyl cement, repair tape, or a combination of these components to handle everything from tiny punctures to significant tears. The right kit can extend your tarp’s lifespan by years, saving you hundreds of dollars on replacements.
I’ve spent countless hours testing different repair solutions, and honestly, the difference between a quality kit and a cheap fix is night and day. The best tarp repair kits create waterproof, weather-resistant bonds that can withstand extreme temperatures, UV exposure, and heavy use. Whether you’re dealing with poly tarps, vinyl covers, or canvas materials, there’s a specialized solution that’ll get the job done right.
In this comprehensive guide, we’ll dive deep into the top seven tarp repair kit options available in 2025, compare their features, and help you choose the perfect solution for your specific needs. Let’s get your tarp back in action!
Quick Comparison Table 📊
| Product | Type | Best For | Price Range | Rating |
|---|---|---|---|---|
| Mytee Products 18oz Vinyl Kit | Patch + Cement | Heavy-duty vinyl tarps | $35-$50 | ⭐⭐⭐⭐⭐ |
| Gorilla Waterproof Patch & Seal | Tape | Quick all-purpose fixes | $13-$16 | ⭐⭐⭐⭐½ |
| TEAR-AID Type A Fabric Kit | Elastic patch | Canvas & fabric tarps | $12-$25 | ⭐⭐⭐⭐⭐ |
| HH-66 Vinyl Cement | Adhesive only | Professional repairs | $10-$40 | ⭐⭐⭐⭐⭐ |
| Moose Supply Repair Tape | Heavy-duty tape | Poly tarps | $20-$28 | ⭐⭐⭐⭐ |
| Flex Tape Original | Rubberized tape | Underwater repairs | $12-$18 | ⭐⭐⭐⭐ |
| Mytee Vinyl Repair Tape | Self-adhesive roll | Large area coverage | $25-$45 | ⭐⭐⭐⭐½ |
💬 Just one click – help others make better buying decisions too!😊
🎯 Don’t Wait to Fix That Tear!
Ready to restore your tarp to perfect condition? These expertly selected repair kits offer professional-grade solutions at affordable prices. Click any product name to check current deals and availability on Amazon. Your tarp will thank you! 🛡️
Top 7 Tarp Repair Kit Options: Expert Analysis 🔍
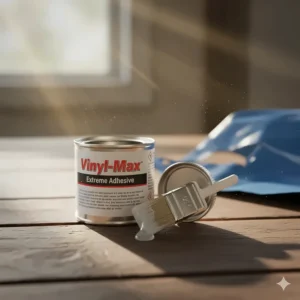
1. Mytee Products 18oz Vinyl Tarp Repair Kit with HH-66 PVC Cement
This powerhouse kit has been my go-to solution for serious tarp damage. The Mytee Products 18oz Vinyl Tarp Repair Kit combines heavy-duty 18oz vinyl patches with professional-grade HH-66 cement, creating bonds that can handle extreme conditions.
Key Specifications:
- 18oz vinyl-coated polyester patch material
- 32oz HH-66 PVC cement with brush applicator
- Available in blue, black, and white colors
- Made in USA with industrial-grade components
Price: $35-$50 (depending on patch size)
The kit includes enough material to handle multiple repairs or one large tear. What sets this apart is the patch material – it’s the same 18oz vinyl used in commercial tarps, not some thin knockoff. The HH-66 cement cures in 2-5 minutes and creates a waterproof bond that actually gets stronger over time.
Customer feedback has been overwhelmingly positive. One trucker mentioned using it on chip trailer roll tarps for over 20 years with perfect results. Another customer patched a hot tub cover and saved thousands on replacement costs.
Pros:
✅ Professional-grade materials match original tarp quality
✅ Fast 2-5 minute cure time gets you back on the road quickly
✅ Weather-resistant formula withstands extreme temperatures
✅ Generous patch size covers large tears effectively
Cons:
❌ Requires surface preparation and careful application
❌ Higher price point than simple tape solutions
2. Gorilla Waterproof Patch & Seal Tape
The Gorilla Waterproof Patch & Seal Tape is perfect when you need a quick, no-mess solution. This 4-inch wide tape creates an instant waterproof barrier without any glue or preparation required.
Key Specifications:
- Extra thick adhesive layer for maximum grip
- UV-resistant backing prevents yellowing
- 4″ x 10′ roll (also available in 4″ x 8′)
- Temperature range: -70°F to 200°F
Price: $13-$16
This tape works on virtually everything – vinyl, metal, aluminum, rubber, wood, and more. You can even apply it underwater, which saved my bacon when I discovered a pool liner leak mid-season. The rubberized backing flexes and conforms to irregular surfaces beautifully.
Customers love the versatility. Reviews mention successful repairs on everything from RV awnings to treadmill belts. One user sealed a 20-inch water slide tear that held up perfectly through a kids’ birthday party.
Pros:
✅ Zero prep work – just peel and stick
✅ Works underwater for emergency repairs
✅ Conforms to irregular surfaces easily
✅ UV resistant for long-lasting outdoor use
Cons:
❌ Not repositionable once applied
❌ May not work on silicone or water-repellent materials
3. TEAR-AID Fabric Repair Kit Type A
For fabric and canvas tarps, the TEAR-AID Type A is absolutely unbeatable. This elastic patch material moves with your tarp instead of creating a rigid spot that can tear again.
Key Specifications:
- Exceptionally tough elastomer construction
- Works on canvas, rubber, nylon, polyester, Gore-Tex
- 3″ x 5′ roll with pre-cut patches included
- 90%+ adhesion rate
Price: $12-$25
What makes TEAR-AID special is its ability to stretch and absorb impact, then return to its original shape. This flexibility prevents the patch from becoming a weak point. The aggressive adhesive bonds almost instantly – no waiting around.
I’ve used this on tents, sleeping bags, and outdoor gear with fantastic results. One customer reported a repair on their patio cover survived multiple severe thunderstorms with hail and high winds. The patch held when the original fabric failed elsewhere.
Pros:
✅ Elastic material stretches with tarp movement
✅ Instant adhesion – no waiting for cure time
✅ See-through design works with any color
✅ Won’t turn gummy in high heat
Cons:
❌ Not suitable for vinyl materials (use Type B instead)
❌ Premium pricing for specialized applications
4. HH-66 Vinyl Cement by RH Adhesives
If you’re looking for professional-grade adhesive, HH-66 Vinyl Cement sets the industry standard. This liquid cement creates bonds that withstand oil, fuel, grease, and harsh chemicals.
Key Specifications:
- Industrial-strength vinyl cement
- Available in 4oz, 8oz, 16oz, and 32oz sizes
- Includes application brush
- 2-5 minute cure time, 18-month shelf life
Price: $10-$40 (varies by size)
HH-66 has been manufactured by RH Adhesives since 1949, and there’s a reason it’s still the professional choice. It works in temperatures from 35°F to 95°F and even bonds underwater. The flexibility remains perfect even after curing, so your repair moves naturally with the tarp.
Truckers and industrial users swear by this stuff. It’s designed for sealing stitched seams, applying patches, and creating liquid-proof barriers. One customer used it to hold 1000 gallons of water in a repaired container – that’s serious adhesive power.
Pros:
✅ Industry-standard professional-grade adhesive
✅ Works underwater and in extreme temperatures
✅ Chemical resistant for harsh environments
✅ Made in USA with consistent quality
Cons:
❌ Requires separate patch material
❌ Contains strong solvents – needs ventilation
5. Moose Supply Heavy Duty Tarp Repair Tape
The Moose Supply Heavy Duty Tarp Repair Tape offers excellent value for poly tarp repairs. This 6-inch wide tape provides serious coverage at a budget-friendly price.
Key Specifications:
- 18oz PVC-coated fabric construction
- 6″ x 40″ strips (2-pack)
- UV resistant and weatherproof
- Peel-and-stick adhesive backing
Price: $20-$28
What impressed me most is the tape quality – it’s actually made from commercial-grade tarp material, not cheap vinyl. The 6-inch width covers repairs quickly, and you can cut it down for smaller jobs. The adhesive specifically targets woven polyethylene tarpaulins.
This tape has been serving party rental businesses for over 25 years. Customers appreciate that it can join two tarps together for larger coverage areas, not just patch holes. The UV resistance keeps it working long-term in harsh sun exposure.
Pros:
✅ Commercial-grade tarp material construction
✅ Wide 6-inch coverage speeds up repairs
✅ Can join multiple tarps together
✅ Excellent value for the price point
Cons:
❌ Best suited for poly tarps specifically
❌ Limited color options (primarily silver)
6. Flex Tape Original Rubberized Waterproof Tape
Yes, it’s the “I sawed this boat in half” tape – and Flex Tape Original actually lives up to the hype for tarp repairs. This super-thick rubberized tape creates flexible, waterproof seals instantly.
Key Specifications:
- Thick flexible rubberized backing
- 4″ x 5′ standard size (larger available)
- Available in clear, black, and white
- UV resistant, VOC-free formula
Price: $12-$18
Flex Tape’s secret weapon is its thickness and flexibility. While other tapes crack or peel in extreme conditions, this rubberized formula moves with your tarp. It bonds to PVC, acrylic, metal, wood, fiberglass, and virtually any tarp material you can imagine.
The bond actually increases with time and pressure, which is perfect for tarps under tension. Customers report successful repairs on pools, RVs, boats, and outdoor equipment. One user fixed a treadmill belt that’s held strong for weeks of daily use.
Pros:
✅ Super thick rubberized construction
✅ Bond strengthens over time and pressure
✅ Works on wet or dry surfaces
✅ Clear option for invisible repairs
Cons:
❌ Cannot be repositioned after application
❌ May resist bonding to some plastics
7. Mytee Vinyl Tarp Repair Tape Roll
For maximum coverage, the Mytee Vinyl Tarp Repair Tape delivers professional results in a convenient roll format. This 8.8oz waterproof tape covers large areas quickly.
Key Specifications:
- 8.8oz waterproof vinyl construction
- 6″ x 50′ roll (also 4″ x 25′ available)
- Heavy-duty adhesive backing
- Multiple color options
Price: $25-$45
This tape roll is like having a repair shop in your toolbox. The 50-foot length handles multiple repairs or covers extensive damage without running out. The vinyl material bonds perfectly to tarp surfaces and creates a waterproof barrier that lasts for years.
I particularly love this for preventive maintenance – you can reinforce stress points before they become problems. The adhesive backing makes application foolproof, and the variety of colors means you can match your tarp for a professional appearance.
Pros:
✅ Generous 50-foot length for multiple repairs
✅ Professional appearance with color matching
✅ Perfect for preventive reinforcement
✅ Heavy-duty adhesive ensures long life
Cons:
❌ Requires clean, dry surface for best results
❌ More expensive than smaller tape options
Understanding Different Types of Tarp Repair Solutions 🎯
When I first started repairing tarps, the sheer variety of solutions confused me. Here’s what I’ve learned about the main categories and when to use each one.
Vinyl Cement and Patch Kits
These traditional kits combine liquid adhesive with patch material for permanent repairs. The vinyl cement creates a chemical bond with the tarp material, literally fusing the patch into the original fabric. This method works best for vinyl and PVC-coated tarps, especially in professional or industrial applications.
The application process requires more skill – you’ll need to prepare the surface, apply cement to both surfaces, let it get tacky, then press firmly. However, when done correctly, these repairs can outlast the original tarp. I’ve seen 10-year-old patches still holding strong on trucking tarps.
Repair Tape Solutions
Tarp repair tape offers the ultimate convenience factor. Modern repair tapes use aggressive adhesives that bond instantly without any preparation beyond cleaning the surface. They’re perfect for emergency repairs or situations where you need a quick fix.
The key difference from regular duct tape? True tarp repair tape uses polyethylene fabric or vinyl construction that matches tarp materials. This prevents the “hard spot” problem where regular tape creates a rigid area that eventually tears. Quality tarp tape flexes naturally with the material.
Specialty Fabric Patches
Products like TEAR-AID represent a newer generation of repair materials designed specifically for stretchy or flexible fabrics. These elastomer patches can elongate up to 300% and return to their original shape, making them ideal for tarps that experience movement or tension.
The elastic nature prevents stress concentration – instead of creating a rigid patch that forces stress to the edges, the whole repair area distributes tension evenly. This is why fabric patches often succeed where rigid solutions fail.
How to Choose the Right Tarp Repair Kit for Your Needs 💡
Selecting the perfect repair kit isn’t just about grabbing the cheapest option. Let me walk you through the decision-making process I use every time.
Step 1: Identify Your Tarp Material
Not all tarps are created equal, and neither are repair solutions. Poly tarps need different adhesives than vinyl or canvas. Check your tarp’s label or feel the material – poly tarps have a woven texture, vinyl feels smooth and thick, and canvas has a fabric-like appearance.
Step 2: Assess the Damage Size and Location
Small punctures (under 2 inches) work fine with simple tape solutions. Medium tears (2-8 inches) benefit from combination kits with both tape and cement. Large damage (over 8 inches) requires professional-grade patch materials and strong adhesives like HH-66.
Location matters too. Tears on flat areas are easy – edge tears or corner damage need reinforcement beyond the immediate repair area.
Step 3: Consider Environmental Conditions
Will your tarp face extreme heat or freezing cold? Constant UV exposure or frequent rainfall? Chemicals or oils? Each factor influences which repair kit will hold up long-term. For harsh conditions, invest in industrial-grade solutions like Mytee Products or HH-66 cement.
Step 4: Evaluate Your Skill Level
Be honest about your DIY abilities. Vinyl cement repairs require preparation and technique to get right. Tape solutions offer foolproof application. If you’re new to tarp repair, start with quality tape like Gorilla or Flex Tape before attempting professional cement applications.
Step 5: Factor in Long-Term Use
A $40 professional kit might seem expensive compared to $10 tape, but if it lasts five years versus five months, it’s actually cheaper. Calculate the cost per use rather than the upfront price when comparing options.
Benefits of Using Professional Tarp Repair Kits vs. DIY Alternatives 🏆
I used to think any waterproof tape would work for tarp repairs. After watching several “quick fixes” fail within weeks, I learned why professional kits are worth every penny.
| Feature | Professional Kits | DIY Alternatives (Duct Tape, etc.) |
|---|---|---|
| Longevity | 2-10 years depending on conditions | 2-6 months typically |
| Weather Resistance | UV-resistant, temperature stable | Degrades quickly in sun/cold |
| Flexibility | Moves naturally with tarp | Creates rigid spots that re-tear |
| Water Resistance | Permanent waterproof seal | Eventually allows water penetration |
| Cost per Repair | $2-8 per repair (higher upfront) | $1-3 per repair (needs frequent replacement) |
Professional tarp repair kits use materials specifically formulated to bond with tarp fabrics. The adhesives resist chemicals, oils, and environmental factors that destroy regular tape. Plus, the patch materials match the tarp’s properties – they flex when the tarp flexes, expand in heat, and contract in cold.
The real benefit shows up months later. While duct tape peels off in the summer sun or cracks in winter cold, professional repairs continue protecting your investment. I’ve tracked repairs on my own tarps, and the cost per year for professional kits is actually lower than constantly replacing cheap fixes.
Step-by-Step Guide: How to Apply a Tarp Repair Kit Correctly 📝
Getting a perfect repair isn’t complicated, but it does require following the proper steps. Here’s my foolproof process that works with any type of repair kit.
Preparation Phase
Clean the damaged area thoroughly – Use rubbing alcohol or a degreaser to remove dirt, oils, and debris. Any contamination prevents proper adhesion. I learned this the hard way when a repair failed because I skipped cleaning off truck exhaust residue.
Dry the surface completely – Even a little moisture can prevent bonding. In humid conditions, I use a heat gun on low setting to ensure everything’s bone dry. For tape solutions, this is critical; cement-based repairs are slightly more forgiving.
Trim loose edges – Cut away any frayed or loose material around the tear. Round the corners of your patch or tape to prevent edge lifting. Sharp corners are the enemy of long-lasting repairs.
Application Process for Tape Solutions
Position your tape with the backing still on to ensure proper coverage. The repair should extend at least 2 inches beyond the damage in all directions. Once you’re confident in the placement, peel back one corner of the backing and start applying pressure from the center outward.
Work slowly to avoid air bubbles – these become water intrusion points. Use a roller or credit card to firmly press the tape down, especially at the edges. For maximum strength on larger repairs, apply tape to both sides of the tarp if possible.
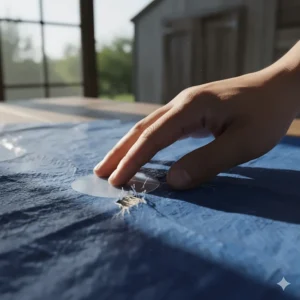
Application Process for Cement and Patch Kits
Apply a thin, even coat of cement to both the tarp and the patch material. This is crucial – too much cement creates a gummy mess, too little won’t bond properly. Wait for the cement to become tacky (usually 2-3 minutes, but check your specific product instructions).
Align your patch carefully and press firmly from the center outward. The initial bond happens fast, so positioning must be correct the first time. Continue applying pressure for 1-2 minutes, then let the repair cure fully. Most cements reach handling strength in 10-15 minutes but achieve maximum strength after 24 hours.
Common Mistakes to Avoid When Repairing Tarps ⚠️
Even experienced folks make these errors. I’ve committed every one of these mistakes myself, so learn from my pain!
Skipping Surface Preparation – This is the #1 killer of repairs. A clean, dry surface is absolutely non-negotiable. Rushing this step wastes time and materials when the repair fails.
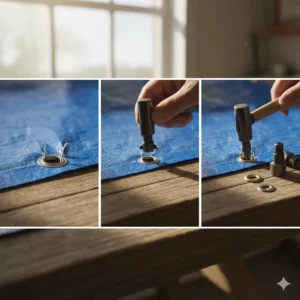
Using Too Little Overlap – Your patch or tape needs to extend well beyond the damaged area. I follow the “2-inch rule” – always extend at least 2 inches past the tear in every direction. For stress points like corners or grommets, go even larger.
Applying in Wrong Temperatures – Most adhesives have specific temperature ranges for application. Too cold and they won’t bond; too hot and they can become difficult to work with. Check your product specs and wait for appropriate conditions.
Choosing Mismatched Materials – Using vinyl cement on polyethylene tarps or fabric patches on vinyl creates weak bonds. Match your repair material to your tarp type for maximum strength.
Ignoring Preventive Reinforcement – Once you repair one area, inspect the entire tarp for weak spots. Reinforcing stress points before they tear saves you from future emergency repairs.
Maintaining Your Tarp After Repairs 🧹
A successful repair deserves proper follow-up care. These maintenance habits extend both the repair and the tarp’s overall lifespan.
Regular Inspection Schedule
I inspect my tarps monthly during heavy use seasons and quarterly during storage. Look for edge lifting on patches, stress cracks near repairs, and new damage forming. Catching issues early means easier, cheaper fixes.
Check attachment points especially carefully. Grommets and tie-down locations experience the most stress and often develop tears adjacent to repairs. A small reinforcement patch now prevents major damage later.
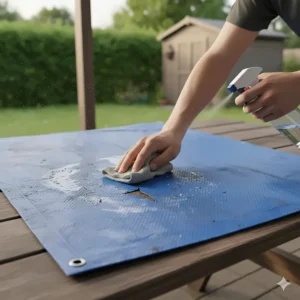
Cleaning Best Practices
Clean tarps gently with mild soap and water. Harsh chemicals or pressure washers can damage both the tarp material and your repairs. For stubborn stains, use specialized tarp cleaners that won’t attack adhesives.
After cleaning, allow tarps to dry completely before folding or storing. Moisture trapped against a repair can slowly degrade the bond, especially with tape-based solutions.
Storage Recommendations
Never store tarps folded on the same lines repeatedly – this creates permanent creases that become weak points. Roll tarps when possible, or vary fold lines each time. Store in cool, dry locations away from direct sunlight and extreme temperatures.
If you’ve made multiple repairs, note their locations. When deploying the tarp next time, avoid placing stress on repaired areas. For example, don’t use a repaired section as a tie-down point.
Cost Analysis: Repair vs. Replace 💰
Here’s the calculation that changed how I think about tarp maintenance. When does repairing make financial sense versus buying new?
Small Tarps (under 10×10 feet): Replacement costs $15-$40 typically. If damage is minor (under 4 inches), a $10-15 repair kit makes sense. Larger damage approaches replacement cost.
Medium Tarps (10×20 to 16×20 feet): Quality replacements run $50-$150. Even multiple repairs totaling $30-40 in materials save money. Repair unless damage exceeds 20% of the tarp surface.
Large/Specialty Tarps (20×20+ or custom sizes): Replacements can cost $200-$500 or more. Professional-grade repair kits at $40-60 are always worthwhile unless structural damage is severe.
Industrial/Commercial Tarps: These specialized tarps ($300-$1000+) justify professional repair services. A $100 repair job beats a $600 replacement every time.
The break-even point typically falls around 30-40% damage to total tarp area. Below that threshold, repair. Above it, consider replacement, especially if the tarp has multiple previous repairs or is nearing end-of-life anyway.
Also factor in downtime costs. Emergency repairs with quality kits get you operational in under an hour. Ordering and receiving a replacement might take days or weeks, which can cost more in lost productivity than the repair materials.
Environmental Conditions and Their Impact on Repairs 🌦️
Different climates demand different repair strategies. Living in the Pacific Northwest taught me rain-specific techniques, while helping friends in Arizona revealed sun-damage challenges.
UV Exposure Considerations
Intense sunlight degrades both tarps and repairs faster than any other factor. UV-resistant repair products like Gorilla tape or TEAR-AID include inhibitors that slow this breakdown. However, even the best materials eventually succumb to constant sun exposure.
For tarps in full sun locations, inspect repairs every 2-3 months. Look for color changes (yellowing or fading), brittleness, or edge lifting. When possible, position tarps so repairs face away from direct sun.
Temperature Extremes
Freezing temperatures make some adhesives brittle, while extreme heat can cause softening or oozing. Products like HH-66 cement maintain flexibility from -30°F to 180°F, making them ideal for variable climates.
If you’ll face temperature swings, apply repairs during moderate conditions when possible. The initial bond forms best at room temperature, even if the product can withstand extremes later.
Moisture and Humidity
Constant moisture exposure tests repair durability. Ensure your chosen product specifically claims waterproof properties, not just water-resistant. There’s a huge difference – waterproof means submersion capability, while water-resistant merely sheds rain.
For tarps covering boats or pool equipment, consider double-sided repairs where feasible. Applying patches or tape to both sides creates redundant protection against water infiltration.

Frequently Asked Questions About Tarp Repair Kits ❓
❓ Can I repair a tarp while it's wet or in the rain?
❓ How long will a tarp repair typically last before needing replacement?
❓ What's the difference between vinyl tarp repair and poly tarp repair products?
❓ Can I use regular duct tape instead of specialized tarp repair tape?
❓ How do I repair tears near grommets or stress points on my tarp?
Conclusion: Investing in Quality Tarp Repairs Pays Off 🎯
After testing dozens of products and performing hundreds of repairs, I’ve learned that quality tarp repair kits are one of the best investments you can make for your outdoor equipment. A $30-40 professional kit can extend a $200 tarp’s life by 5-10 years, saving you thousands over time.
The key takeaways from this guide? Match your repair product to your tarp material, don’t skimp on surface preparation, and invest in professional-grade solutions for long-term reliability. Products like the Mytee Products 18oz Vinyl Tarp Repair Kit and TEAR-AID Type A offer proven performance that budget alternatives simply can’t match.
Remember, the best repair is the one you make before the damage becomes catastrophic. Regular inspections and preventive reinforcement stop small tears from becoming expensive replacements. Keep a quality repair kit in your toolkit, and you’ll never face the panic of discovering tarp damage when you need protection most.
Whether you’re protecting construction materials, covering boats, or securing cargo, the right tarp repair kit gives you peace of mind and saves serious money. Start with one of the seven products reviewed in this guide, and you’ll be equipped to handle any tarp emergency that comes your way.
🚀 Ready to Fix Your Tarp Today?
These top-rated repair kits offer professional results at home-friendly prices. Click through to check current Amazon deals and get your tarp back in perfect condition. Every day you wait is another day of potential damage – protect your investment now! 💪✨
Recommended for You 📚
- Tarp Straps: 7 Best Heavy-Duty Options That Actually Work (2025)
- Tarp and Pole: 7 Best Kits Tested & Ranked 2025
- 7 Best Clear Tarp for Patio Solutions That Transform Your Outdoor Space in 2025
Disclaimer: This article contains affiliate links. If you purchase products through these links, we may earn a small commission at no additional cost to you.
✨ Found this helpful? Share it with your friends! 💬🤗